> ## Documentation Index
> Fetch the complete documentation index at: https://help.messagesync.ai/llms.txt
> Use this file to discover all available pages before exploring further.
# Send iMessage
> The action is a custom workflow action that sends an iMessage to a contact directly from your CRM workflows, using your connected Apple device. Automate replies, confirmations, reminders, and follow-ups without sending anything by hand.
> Why it matters: Manually replying to contacts over iMessage doesn't scale. With this action you can send personalized iMessages triggered by any CRM event-new leads, appointments, form submissions, replies, and more.
***
## Key Benefits[](#key-benefits "Direct link to Key Benefits")
**Automated Messaging** - Send iMessages automatically from any workflow
**Personalized Content** - Use custom variables to tailor every message
**Attachment Support** - Include an image, video, or file with your message
**Multi-Device Support** - Choose which connected Apple device sends the message
**Workflow Integration** - Combine with any CRM trigger for powerful automation
***
## Who Should Use It[](#who-should-use-it "Direct link to Who Should Use It")
**Sales Teams** - Instantly follow up with new leads over iMessage
**Support Teams** - Send confirmations and updates automatically
**Agencies** - Automate client-facing messaging across sub-accounts
**Operations** - Send reminders, alerts, and status updates
**Marketers** - Deliver timely, personalized iMessage touches
***
## Requirements[](#requirements "Direct link to Requirements")
Before using this action:
**Update your iMessage provider app** to the latest version
* Go to **App Marketplace → Installed Apps → iMessage provider → Update**
**Connect a native (Apple device) instance**
* Use the **Native Instance Settings dashboard** to connect one or more Apple devices
***
## How to Set Up[](#how-to-set-up "Direct link to How to Set Up")
### Step 1: Create or Edit a Workflow[](#step-1-create-or-edit-a-workflow "Direct link to Step 1: Create or Edit a Workflow")
Go to **Automation → Workflows**
Create a new workflow or edit an existing one
Add your desired trigger (Form Submitted, iMessage Inbound, Appointment Booked, etc.)
### Step 2: Add the Action[](#step-2-add-the-action "Direct link to Step 2: Add the Action")
Click **+** or **Add New Action** after your trigger
Switch to the **Apps** tab
Click the **iMessage provider** app icon
Select **Send iMessage**
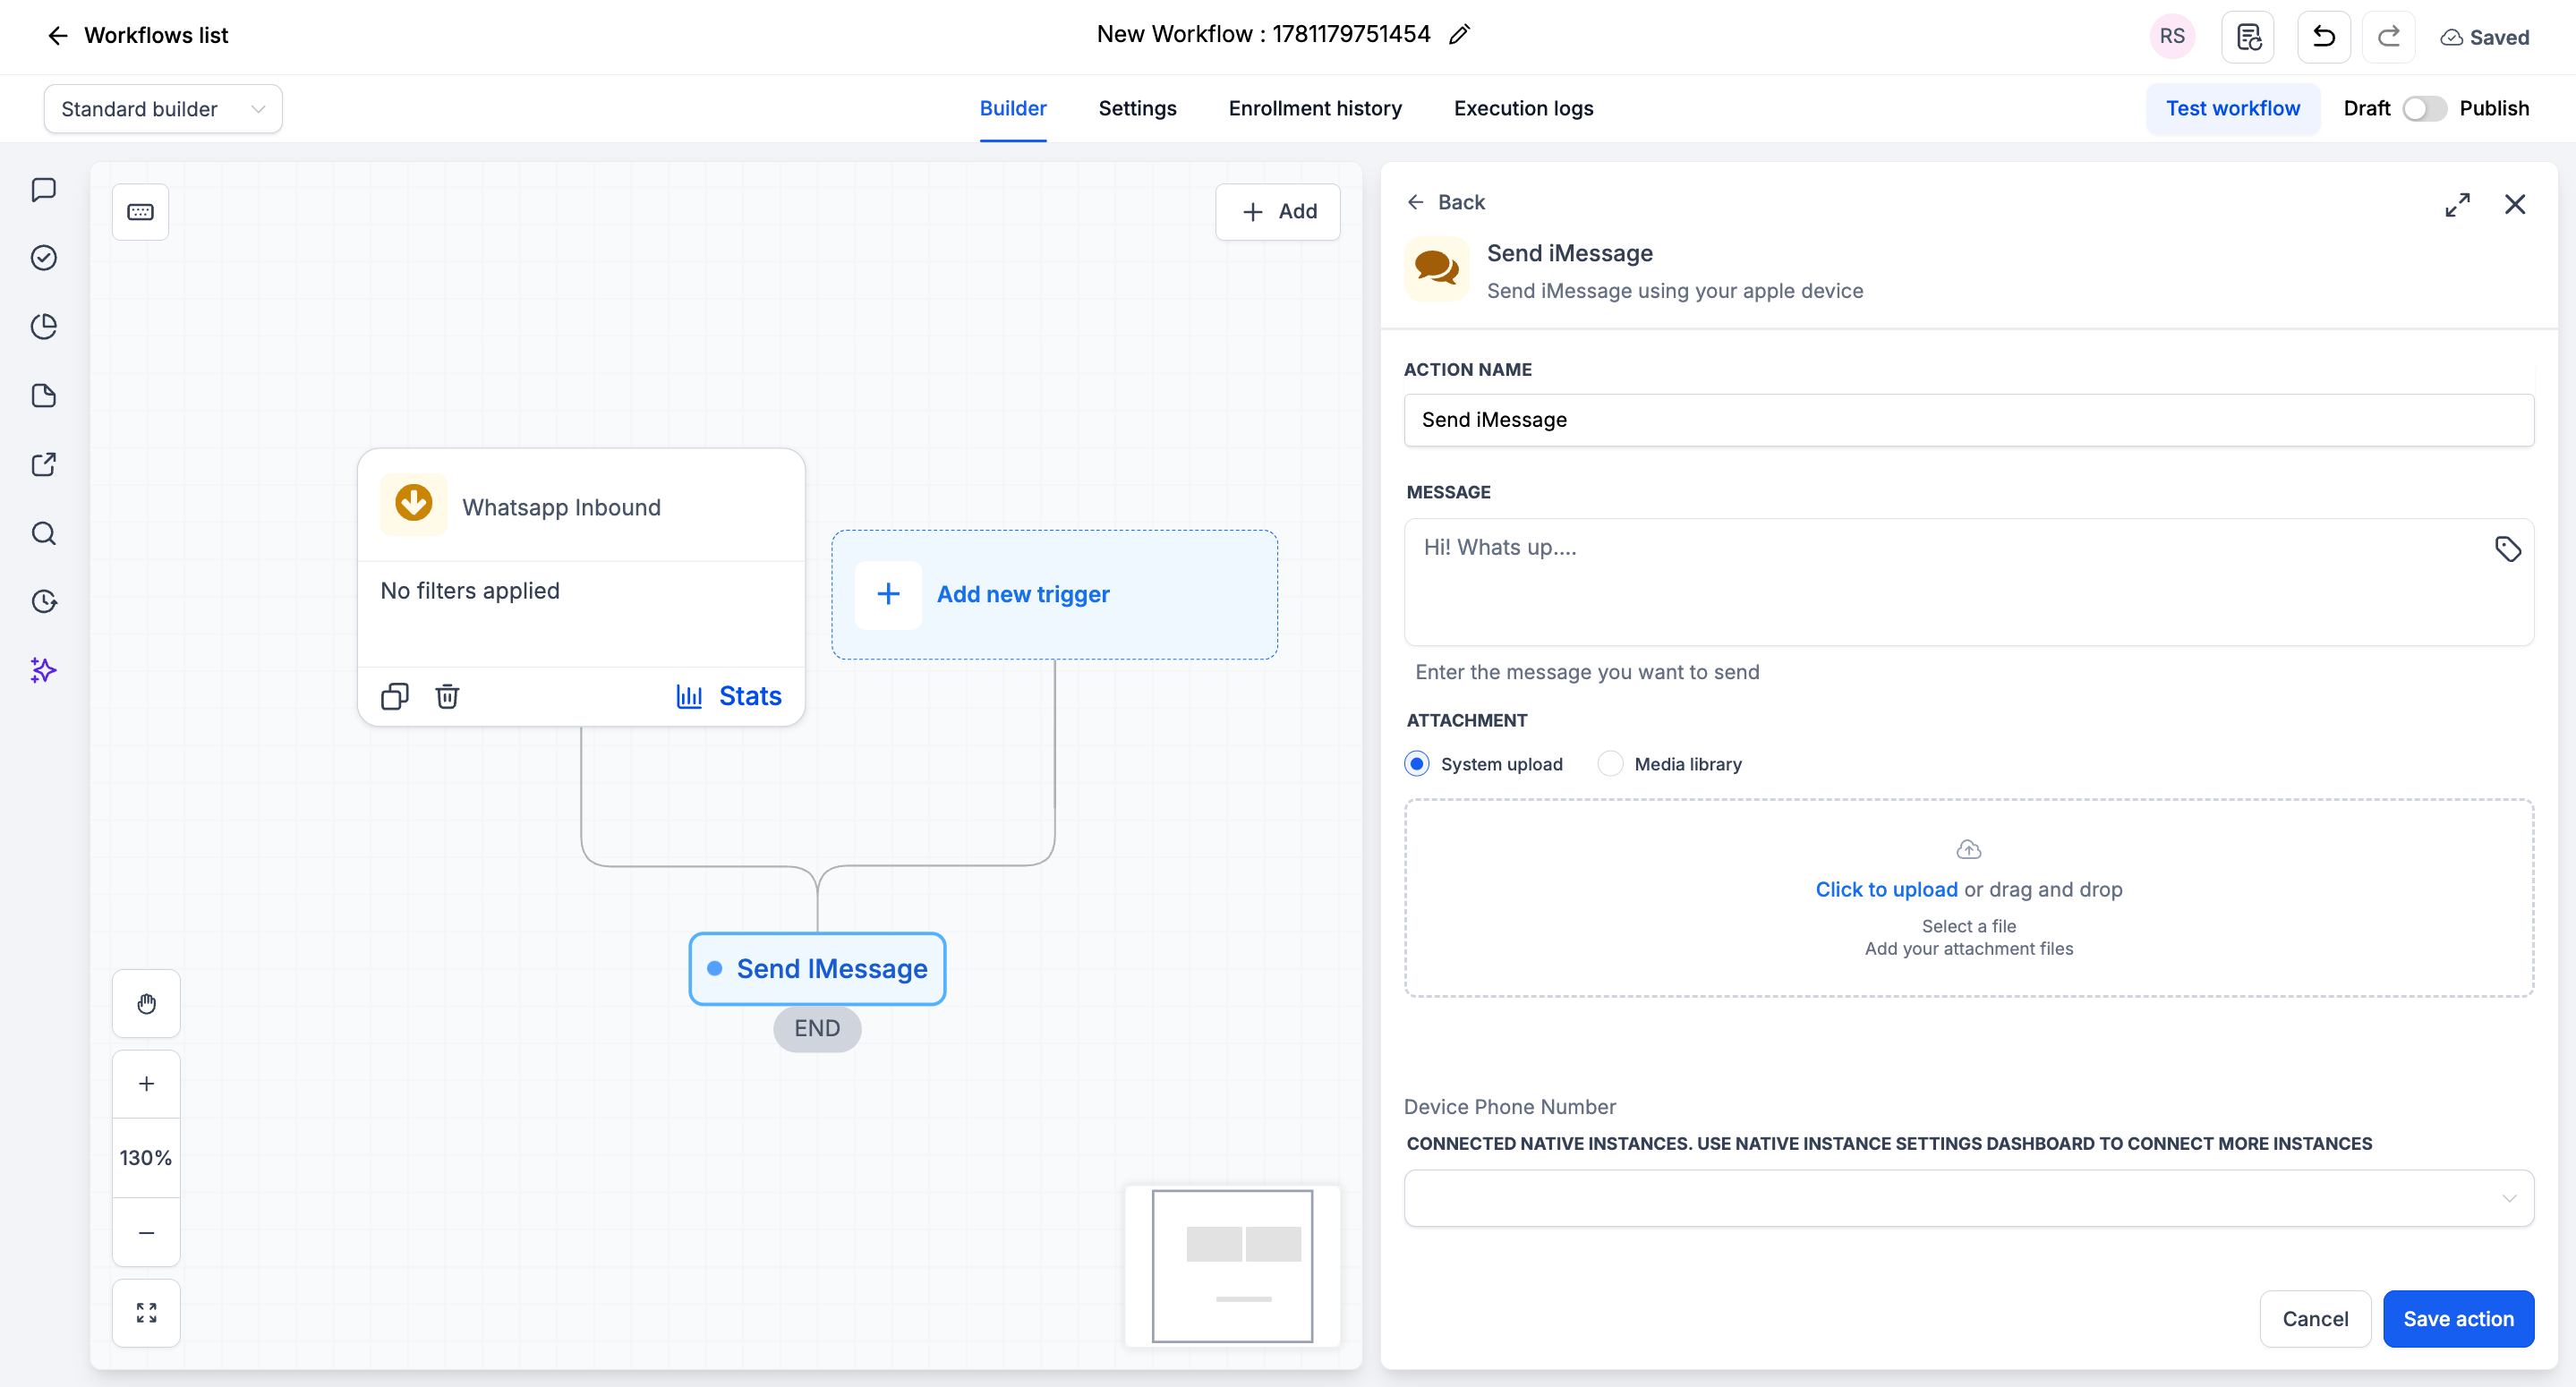 ### Step 3: Configure the Action[](#step-3-configure-the-action "Direct link to Step 3: Configure the Action")
| Field | Required | Description |
| ----------------------- | -------- | --------------------------------------------------------------------------------------------- |
| **Action Name** | Yes | A label for this action in the workflow (e.g. "Send iMessage") |
| **Message** | Yes | The message text to send (supports custom variables) |
| **Attachment** | No | Upload a file (**System upload**) or pick one from the **Media library** |
| **Device Phone Number** | No | The connected Apple device to send from. Leave empty to use your dashboard's default instance |
### Step 4: Save and Publish[](#step-4-save-and-publish "Direct link to Step 4: Save and Publish")
Click **Save action**
Review your complete workflow
Toggle from **Draft** to **Published**
***
## Action Fields Explained[](#action-fields-explained "Direct link to Action Fields Explained")
### Message Field[](#message-field "Direct link to Message Field")
Enter the message you want to send. You can:
* Type plain text
* Use **custom variables** (click the tag icon to insert)
* Include emojis
* Use line breaks for formatting
**Example with variables:**
```text theme={null}
Hi {{contact.first_name}} Thanks for reaching out! A member of our team will get back to you shortly.Meanwhile, feel free to reply here with any questions.
```
### Attachment Field[](#attachment-field "Direct link to Attachment Field")
Attach a file to send with your message. You have two options:
* **System upload** - Click to upload, or drag and drop a file
* **Media library** - Select an existing file from your library
This field is optional.
### Device Phone Number Field[](#device-phone-number-field "Direct link to Device Phone Number Field")
Choose which connected Apple device sends the message.
> **Connected native instances.** Use the Native Instance Settings dashboard to connect more instances.
***
## Example Use Cases[](#example-use-cases "Direct link to Example Use Cases")
### Use Case 1: Instant Lead Follow-Up[](#use-case-1-instant-lead-follow-up "Direct link to Use Case 1: Instant Lead Follow-Up")
Reply to a new lead the moment they submit a form.
**Trigger:** Form Submitted
**Action:** Send iMessage
* **Message:**
```text theme={null}
Hi {{contact.first_name}}! Thanks for your interest. We received your request and will be in touch within the next few minutes.
```
***
### Use Case 2: Auto-Reply to Inbound Messages[](#use-case-2-auto-reply-to-inbound-messages "Direct link to Use Case 2: Auto-Reply to Inbound Messages")
Acknowledge every inbound iMessage automatically.
**Trigger:** iMessage Inbound
**Action:** Send iMessage
* **Message:**
```text theme={null}
Thanks for your message! We've received it and will reply shortly.
```
***
## Important Notes[](#important-notes "Direct link to Important Notes")
### Technical Details[](#technical-details "Direct link to Technical Details")
* Messages send from your connected Apple device (native instance)
* Leaving **Device Phone Number** empty uses your dashboard's default instance
* Supports text, emojis, and one attachment per message
* Works with all standard CRM workflow triggers
### Best Practices[](#best-practices "Direct link to Best Practices")
* Keep messages concise and personal
* Use relevant variables only
* Test before publishing
* Avoid over-messaging - too many messages cause fatigue
***
## FAQs[](#faqs "Direct link to FAQs")
The one you select in the **Device Phone Number** field. Connect more devices from the Native Instance Settings dashboard.
Yes. Use the **Attachment** field to upload a file (System upload) or pick one from the Media library.
Yes. Click the tag icon in the Message field to insert custom variables like `{{contact.first_name}}`.
The message will fail to send. Make sure your connected device stays online and signed in to iMessage.
***
## Support[](#support "Direct link to Support")
If you need help with the setup or onboarding:
* Email: [**support@messagesync.ai**](mailto:support@messagesync.ai)
### Step 3: Configure the Action[](#step-3-configure-the-action "Direct link to Step 3: Configure the Action")
| Field | Required | Description |
| ----------------------- | -------- | --------------------------------------------------------------------------------------------- |
| **Action Name** | Yes | A label for this action in the workflow (e.g. "Send iMessage") |
| **Message** | Yes | The message text to send (supports custom variables) |
| **Attachment** | No | Upload a file (**System upload**) or pick one from the **Media library** |
| **Device Phone Number** | No | The connected Apple device to send from. Leave empty to use your dashboard's default instance |
### Step 4: Save and Publish[](#step-4-save-and-publish "Direct link to Step 4: Save and Publish")
Click **Save action**
Review your complete workflow
Toggle from **Draft** to **Published**
***
## Action Fields Explained[](#action-fields-explained "Direct link to Action Fields Explained")
### Message Field[](#message-field "Direct link to Message Field")
Enter the message you want to send. You can:
* Type plain text
* Use **custom variables** (click the tag icon to insert)
* Include emojis
* Use line breaks for formatting
**Example with variables:**
```text theme={null}
Hi {{contact.first_name}} Thanks for reaching out! A member of our team will get back to you shortly.Meanwhile, feel free to reply here with any questions.
```
### Attachment Field[](#attachment-field "Direct link to Attachment Field")
Attach a file to send with your message. You have two options:
* **System upload** - Click to upload, or drag and drop a file
* **Media library** - Select an existing file from your library
This field is optional.
### Device Phone Number Field[](#device-phone-number-field "Direct link to Device Phone Number Field")
Choose which connected Apple device sends the message.
> **Connected native instances.** Use the Native Instance Settings dashboard to connect more instances.
***
## Example Use Cases[](#example-use-cases "Direct link to Example Use Cases")
### Use Case 1: Instant Lead Follow-Up[](#use-case-1-instant-lead-follow-up "Direct link to Use Case 1: Instant Lead Follow-Up")
Reply to a new lead the moment they submit a form.
**Trigger:** Form Submitted
**Action:** Send iMessage
* **Message:**
```text theme={null}
Hi {{contact.first_name}}! Thanks for your interest. We received your request and will be in touch within the next few minutes.
```
***
### Use Case 2: Auto-Reply to Inbound Messages[](#use-case-2-auto-reply-to-inbound-messages "Direct link to Use Case 2: Auto-Reply to Inbound Messages")
Acknowledge every inbound iMessage automatically.
**Trigger:** iMessage Inbound
**Action:** Send iMessage
* **Message:**
```text theme={null}
Thanks for your message! We've received it and will reply shortly.
```
***
## Important Notes[](#important-notes "Direct link to Important Notes")
### Technical Details[](#technical-details "Direct link to Technical Details")
* Messages send from your connected Apple device (native instance)
* Leaving **Device Phone Number** empty uses your dashboard's default instance
* Supports text, emojis, and one attachment per message
* Works with all standard CRM workflow triggers
### Best Practices[](#best-practices "Direct link to Best Practices")
* Keep messages concise and personal
* Use relevant variables only
* Test before publishing
* Avoid over-messaging - too many messages cause fatigue
***
## FAQs[](#faqs "Direct link to FAQs")
The one you select in the **Device Phone Number** field. Connect more devices from the Native Instance Settings dashboard.
Yes. Use the **Attachment** field to upload a file (System upload) or pick one from the Media library.
Yes. Click the tag icon in the Message field to insert custom variables like `{{contact.first_name}}`.
The message will fail to send. Make sure your connected device stays online and signed in to iMessage.
***
## Support[](#support "Direct link to Support")
If you need help with the setup or onboarding:
* Email: [**support@messagesync.ai**](mailto:support@messagesync.ai)